My trip to Asia was a world wind! I went to Taipei, Seoul and Hong Kong. Flying 6 times especially with two 13 hour flights, it took me a while to get my bearings when I got home.
I was in Taipei for a weekend getaway and the main purpose was to eat their street food and street meat! I never new Taipei was known for their street food, they put other cities and countries to shame.
I did do my nails prior to leaving Vancouver thinking I will get a blinged out Asian manicure while I am away. Let's just say it did not pan out as I thought it would. My friend and I were exhausted from a day filled with shopping and eating so we decided to go get a manicure. Mind you, this was about 10:30PM. We were in a pretty bumpin part of town near our hotel. However, I did not recall ever seeing a tattoo shop or a body piercing place. Hummers parked on street corners in Asia. So gangster. Regardless, we finally saw a nail salon that was open!!! We practically ran in because we wanted someplace to sit and get pampered. Boy oh boy were we in for a surprise. This two seater place also had a bed in there for girls to get eye lash extensions ... in the open. We sat down and we knew it was a mistake. The vibe from the place seemed like they catered to a specific type of late night career woman. Then the girl doing my nails started FILING off the polish instead of using nail polish remover. I almost cried. Because they only spoke Mandarin, I was in no luck. I was locked in for the rest of the ride. Turns out the polish was Shellac-ish. I had the worse time getting it off when I got home and my nail underneath was scratched up :(
So ladies, don't go to some random hole in the wall at around 11 in the night to get a manicure. Wait until daylight when you are well rested and level headed.
I thought I would score lots of cute DIY knick knacks while I was in Korea. But no such luck and no such time. However, while I was in Hong Kong my BFF Vivian took me to the fabric district. I was in HEAVEN. It was basically blocks of stores selling fabric, trims, beads, buttons, bindings, findings, crafting goods ... just EVERYTHING!!! This area is called Sham Shu Po in Kowloon.
One of my favorite places in that area is Accessory Republic Company Ltd. Not only was their selection HUGE but their prices were so CHEAP (to the eyes of a Canadian crafter that is). The ladies working there were more than helpful! If you have a project in mind they will let you know exactly where each component is and would give you detailed tips and tricks as well. Let's just say these ladies know their stuff and around the neighborhood too. If they didn't carry something they will direct you to a shop nearby.
All in all it was a good trip! I didn't leave my heart in any city but I did leave one of my best friends in Hong Kong. Technically, I didn't leave her there, she moved there hahaha. Vivian, I was glad I got to be with you 24/7 for a couple of weeks until the next time I see you!

Friday, May 31, 2013

Monday, May 13, 2013
SPECIAL GUEST POST!! :)
Hello cee.kwan readers!! *waves*
While cee.kwan is off getting Asianized, I volunteered to do a guest post on her blog. However, like most things in my life...I procrastinated. At first I was super gung-ho to do a tutorial on Canucks inspired nails merging my two obsessions in life together...but Vancouver, I'm sure you know how that panned out this season :( Next year....

Regardless, I still get to indulge myself in nail polish just minus the Canucks, at least until September when preseason starts. Back to nail polish...I have a ton...and I do mean a TON...no joke. But I occasionally get asked...well, doesn't some of it dry out? The answer simply put is yes. There are ways to prevent this like making sure the rims are always clean, but I understand how that isn't a priority sometimes especially when your freshly polished nails are drying. To me, there are three things I do with dried out or slightly dried out nail polish:
1. throw it out
2. use nail polish thinner **if you choose this option don't shake to mix it. I can't stress it enough how bad it is for nail polish to be shaken! Roll the bottle in your hands or hold onto the shaft and roll it out if it's not palm friendly. Shaking nail polish creates bubbles and sometimes it can dry out your polish even more. I see people shaking polish all the time and I think a bit of me dies each time...CRINGE CRINGE CRINGE!!
3. Designs!! :D
Semi dried nail polish is great for nail plates, but I also like to make little thin abstractesque lines with them, especially when a lot of different colours are used on a neutral base. I'm feeling lazy so I will only use one colour, but hopefully you get the point. So what am I trying to achieve? This:

How do I get this?
STEP ONE: plop some nail polish on a surface. I like doing this on my nail plates. Just a reminder this also works with fresh nail polish too, but it'll just take slightly longer.

STEP TWO: Using a dotting tool or a bobby pin start jabbing at the nail polish lifting it off the surface until the polish is stringy. Remember how I mentioned fresh polish will take longer? This is what I meant by that...it'll just take a bit more time for the polish to become aerated.

STEP THREE: Once you have it at a nice stringy consistency, drape the little strands over your nailbed from both sides. The closer you do it to the nail polish blob the thicker lines you'll get...similar the cheese on pizza when you pull away.

STEP FOUR: Clean up the edges and voila! (see above)
Ok this was fun!! I'll post again the next time cee.kwan is on vacay, though it might be avec moi! :D
....provided she lets me that is!
- smallberries
Monday, April 29, 2013
DIY Recycled Gift Boxes
A few weeks ago Louis Vuitton mailed me a magazine/book. The pages were made of heavy print material and the images were just beautiful. Of course there is no point in being a hoarder and keeping it around the house after reading it, but at the same time I thought it was too nice to throw away.

I was taught a little DIY trick in elementary school with old Christmas and birthday cards. You turn them into mini gift boxes!

What you will need:
Ruler
Pencil
Eraser
Scissors
Stapler
2 pieces of hard paper/ soft cardboard which are the same size
Step One: Trimming
Trim about half a centimeter off the bottom and side of one piece of the paper (this will be the bottom part of the box). If the lid and base are the same size, the lid would not fit. Therefore, the bottom piece of the box/paper needs to be a tad smaller than the top piece.
 Step Two: X it
Using a ruler draw a line from top left corner to bottom right corner and a line from the top right corner to the bottom left. Creating an X across the paper.
Step Three: Folding Time
Fold the four sides of paper to the center point of the X. Now your piece of paper should have these creases in it. Then using the eraser, erase all the pencil markings.

Step Four: Cutting Time
I think the photo is self explanatory lol

Step Five: Folding and stapling time!
Fold over the edge and staple it! and Repeat on both ends.


Now repeat steps one through five for the other part of the box!


I was taught a little DIY trick in elementary school with old Christmas and birthday cards. You turn them into mini gift boxes!

What you will need:
Ruler
Pencil
Eraser
Scissors
Stapler
2 pieces of hard paper/ soft cardboard which are the same size
Step One: Trimming
Trim about half a centimeter off the bottom and side of one piece of the paper (this will be the bottom part of the box). If the lid and base are the same size, the lid would not fit. Therefore, the bottom piece of the box/paper needs to be a tad smaller than the top piece.

Using a ruler draw a line from top left corner to bottom right corner and a line from the top right corner to the bottom left. Creating an X across the paper.
Step Three: Folding Time
Fold the four sides of paper to the center point of the X. Now your piece of paper should have these creases in it. Then using the eraser, erase all the pencil markings.

Step Four: Cutting Time
I think the photo is self explanatory lol

Step Five: Folding and stapling time!
Fold over the edge and staple it! and Repeat on both ends.


Now repeat steps one through five for the other part of the box!

Sunday, April 28, 2013
Lacey Nails!
I am pretty sure many of you have seen lacey nail art but have no idea how in the world those people did it! I did it in a few simple steps and I even neglected to clean up my nails for your viewing to show its okay to make a mess ... but really I was just too lazy. Many people use pale pinks and whites to mimic actual lace and to give it a French manicure feel. But for me that is waaaaaay too girly and proper so I chose a sea foam green and black!

What you will need:
2 dotting tools - one medium sized and the other at least 2 sizes smaller
2 different colors of nail polish (lighter color as the base)
Step One and Two:
Paint your nails with the light base color. Then using the larger dotting tool dot a line of circles diagonally across the nail.

Step Three:
Using the smaller dotting tool and the lighter base color dot within the larger circle.

Step Four:
Using the darker color paint diagonally across the upper half of the nail ensuring to cover half of the dotted circles.
Mini Booklet
When I travel I like to keep hard copies of important information on me in case of emergencies, like telephones numbers and addresses.
Instead of carrying a bjillion pieces of paper or one giant one that is folded and crumpled, I make little 6 paged paper booklets that can fit into my wallet! They can also be color coordinated for example, a blue papered one for telephone numbers and a red one for addresses.

What you will need:
Printer paper and scissors


Using scissors cut down the line in the center fold.

Now using both hands grab onto the flaps you just cut and fold the sides down and you have a mini booklet!
Instead of carrying a bjillion pieces of paper or one giant one that is folded and crumpled, I make little 6 paged paper booklets that can fit into my wallet! They can also be color coordinated for example, a blue papered one for telephone numbers and a red one for addresses.

What you will need:
Printer paper and scissors


Using scissors cut down the line in the center fold.

Now using both hands grab onto the flaps you just cut and fold the sides down and you have a mini booklet!
Put a Ring on it!
Sorry for the lack of posting lately! Been uber busy trip planning and tying up lose ends on the home front before I head out! For the next several weeks I will be traveling Asia! Hong Kong, Taipei and Seoul here I come! While I am gone I will have a friend guest blog for me ... hopefully she won't cause too much of a ruckus : )
In preparation along with researching local eateries, tourist attractions, how to commute the bjillion lined subway system in Seoul and where to spend my money I have also been working out more. Yes I am working out. Not a gym rat or hardcore fit person that preaches about it, just a girl trying to do her thing. The last time I was in Hong Kong I gained 10 pounds in 2ish weeks. I admit I am a foodie especially on vacation. I am not hesitant to try anything and everything and I mean EVERYTHING. Says the girl who ate cow brain tacos off a street cart vendor at 2AM in Guadalajara, Mexico. Yes, it tasted all right! I also get really swollen from plane rides to the point I cannot stick my feet back into UGGs and retain alot of water if the weather is hot and humid to the point where my fingers and toes are sausages. Hence I gotta shape up tone up before I go!
Man that was a lengthy intro to my blog about putting a ring on it! lol
While I work out I do not wear any jewelry. For many ladies that work out at a gym I am pretty sure you feel insecure about leaving your valuables in the lockers especially your BLINGED out I'M MARRIED ring! This post is dedicated to my friend Shelley who is getting hitched next year! I came up with an ingenious idea while I was doing pull ups on the chin up bar. I forgot to take my ring off and I was too lazy to put it down, even though I was at home. Shelley said she strings her ring on her necklace while she works out, but to me a necklace while working out is quite cumbersome.
So I looped it into my hair elastic which I tied my hair with! Out of sight but still on me!


In preparation along with researching local eateries, tourist attractions, how to commute the bjillion lined subway system in Seoul and where to spend my money I have also been working out more. Yes I am working out. Not a gym rat or hardcore fit person that preaches about it, just a girl trying to do her thing. The last time I was in Hong Kong I gained 10 pounds in 2ish weeks. I admit I am a foodie especially on vacation. I am not hesitant to try anything and everything and I mean EVERYTHING. Says the girl who ate cow brain tacos off a street cart vendor at 2AM in Guadalajara, Mexico. Yes, it tasted all right! I also get really swollen from plane rides to the point I cannot stick my feet back into UGGs and retain alot of water if the weather is hot and humid to the point where my fingers and toes are sausages. Hence I gotta shape up tone up before I go!
Man that was a lengthy intro to my blog about putting a ring on it! lol
While I work out I do not wear any jewelry. For many ladies that work out at a gym I am pretty sure you feel insecure about leaving your valuables in the lockers especially your BLINGED out I'M MARRIED ring! This post is dedicated to my friend Shelley who is getting hitched next year! I came up with an ingenious idea while I was doing pull ups on the chin up bar. I forgot to take my ring off and I was too lazy to put it down, even though I was at home. Shelley said she strings her ring on her necklace while she works out, but to me a necklace while working out is quite cumbersome.
So I looped it into my hair elastic which I tied my hair with! Out of sight but still on me!


Tuesday, April 9, 2013
Cowabunga dude! Its pizza time!
I know I know another blog post about nail art really?! really! It is happening! Remember TMNT? No? Well it stands for Teenage Mutant Ninja Turtles!

There are 4 of them:
Leonardo - Blue - Katana Sword
Raphael - Red - Twin Sai
Donatello - Purple - Bo Staff
Michelangelo - Orange - Nunchaku

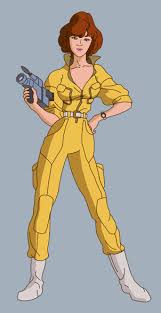
Other main characters include April, the news reporter babe in a one piece yellow jump suit and the wise old master rat Splinter.

Things you will need:
Dotting tools and nail polish!!!
optional - black nail art pen for April's belt buckle if you want to do April
Black - China Glaze: Liquid Leather
White - OPI: Alpine Snow
Yellow - Sally Hansen: Mellow Yellow
Green - OPI: Jade is the New Black
Blue - China Glaze: Electric Beat
Purple - Sephora by OPI: Domestic Goddess
Red - OPI: From A to Zurich
Orange - OPI: Hot & Spicy
Step One: Base
Seeing that it is the month of April I chose to do an accent nail dedicated to April the news reporter :D
Paint 4 nails green and one yellow. Wait till all the nails are dry then using the white nail polish paint a strip across all 5 nails. It is okay if it is mangled like mine! It will be perfected later, trust me! The reason for painting the white strip is to enhance the mask color later. Any color on top of green does not turn out right.
PS: my yellow doesn't have a white strip because it was still drying.
Step Two: Bandana
Paint blue, purple, orange and red on top of the white strips. Again do not panic if it is not perfect, it will be fixed!

Step Three: Eyes
Now using the dotting tool blot 2 white spots for eyes wait until they dry and using a smaller dotting tool blot 2 black dots for pupils! OMG ALMOST DONE!

Step Four: Cleanup
Remember the uneven white strips and colors going over board? Use the green to cover it up! Its just that easy because the green is darker than all the other color used especially the white!
Step Five: April
Using a black nail art pen draw a letter D and a - in it for the belt buckle and using a very fine dotting tool do little black dots for the belt loop holes.

COWABUNGA DUDE NOW YOU'RE DONE LIKE PIZZA DINNER!!!!

There are 4 of them:
Leonardo - Blue - Katana Sword
Raphael - Red - Twin Sai
Donatello - Purple - Bo Staff
Michelangelo - Orange - Nunchaku

Other main characters include April, the news reporter babe in a one piece yellow jump suit and the wise old master rat Splinter.

Things you will need:
Dotting tools and nail polish!!!
optional - black nail art pen for April's belt buckle if you want to do April
Black - China Glaze: Liquid Leather
White - OPI: Alpine Snow
Yellow - Sally Hansen: Mellow Yellow
Green - OPI: Jade is the New Black
Blue - China Glaze: Electric Beat
Purple - Sephora by OPI: Domestic Goddess
Red - OPI: From A to Zurich
Orange - OPI: Hot & Spicy
Step One: Base
Seeing that it is the month of April I chose to do an accent nail dedicated to April the news reporter :D
Paint 4 nails green and one yellow. Wait till all the nails are dry then using the white nail polish paint a strip across all 5 nails. It is okay if it is mangled like mine! It will be perfected later, trust me! The reason for painting the white strip is to enhance the mask color later. Any color on top of green does not turn out right.
PS: my yellow doesn't have a white strip because it was still drying.


Step Two: Bandana
Paint blue, purple, orange and red on top of the white strips. Again do not panic if it is not perfect, it will be fixed!

Step Three: Eyes
Now using the dotting tool blot 2 white spots for eyes wait until they dry and using a smaller dotting tool blot 2 black dots for pupils! OMG ALMOST DONE!

Step Four: Cleanup
Remember the uneven white strips and colors going over board? Use the green to cover it up! Its just that easy because the green is darker than all the other color used especially the white!
Step Five: April
Using a black nail art pen draw a letter D and a - in it for the belt buckle and using a very fine dotting tool do little black dots for the belt loop holes.

COWABUNGA DUDE NOW YOU'RE DONE LIKE PIZZA DINNER!!!!
Subscribe to:
Posts (Atom)